Guides
1. Unbox Your Honbike Uni4
1. What's in the Uni4 box

2. Prepared for assembling
- 1. Open the carton carefully and try not to damage it. Take out the foam.
- 2. Take the bicycle out of the carton carefully by holding the seat tube and handlebar.
- NOTE: Please do not hold on to the front wheel and the fender when lifting upwards.
- 3. You can find the toolbox at the bottom of the carton, put it aside for later use.
- 4. Remove the straps and the foam packaging from the bike.
- NOTE: Don’t throw the foam packaging away; you might need them if you ever need to return the bike.
- 5. Rotate the handlebar anticlockwise.
- 6. Flip the bicycle 180 degrees and place it on levelled ground. Ensure that the bicycle does not fall.
3. Install the front fender
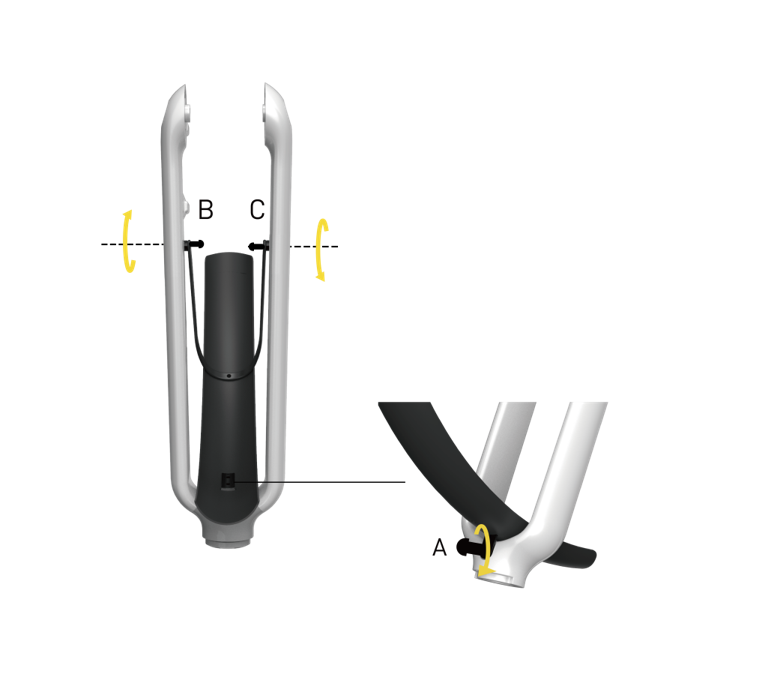
- 1. Take out the front fender and attach it to the front fork.
- 2. Loosely tighten the three M5 bolts to the front fork in the order A, B and C using Hex key #3.
- NOTE: The fender can move up and down in a small range.
- 3. Then firmly tighten each bolt in the order of A, B and C until all bolts are secured.
4. Install the front wheel
- 1. Hold on to the middle part of the axle tightly with one hand, and loosen the axle nut on any side anticlockwise with a socket spanner. Remove the axle nut, washer, and axle and set them aside for later use.
- 2. Remove the plastic guard that protects the brake disc.
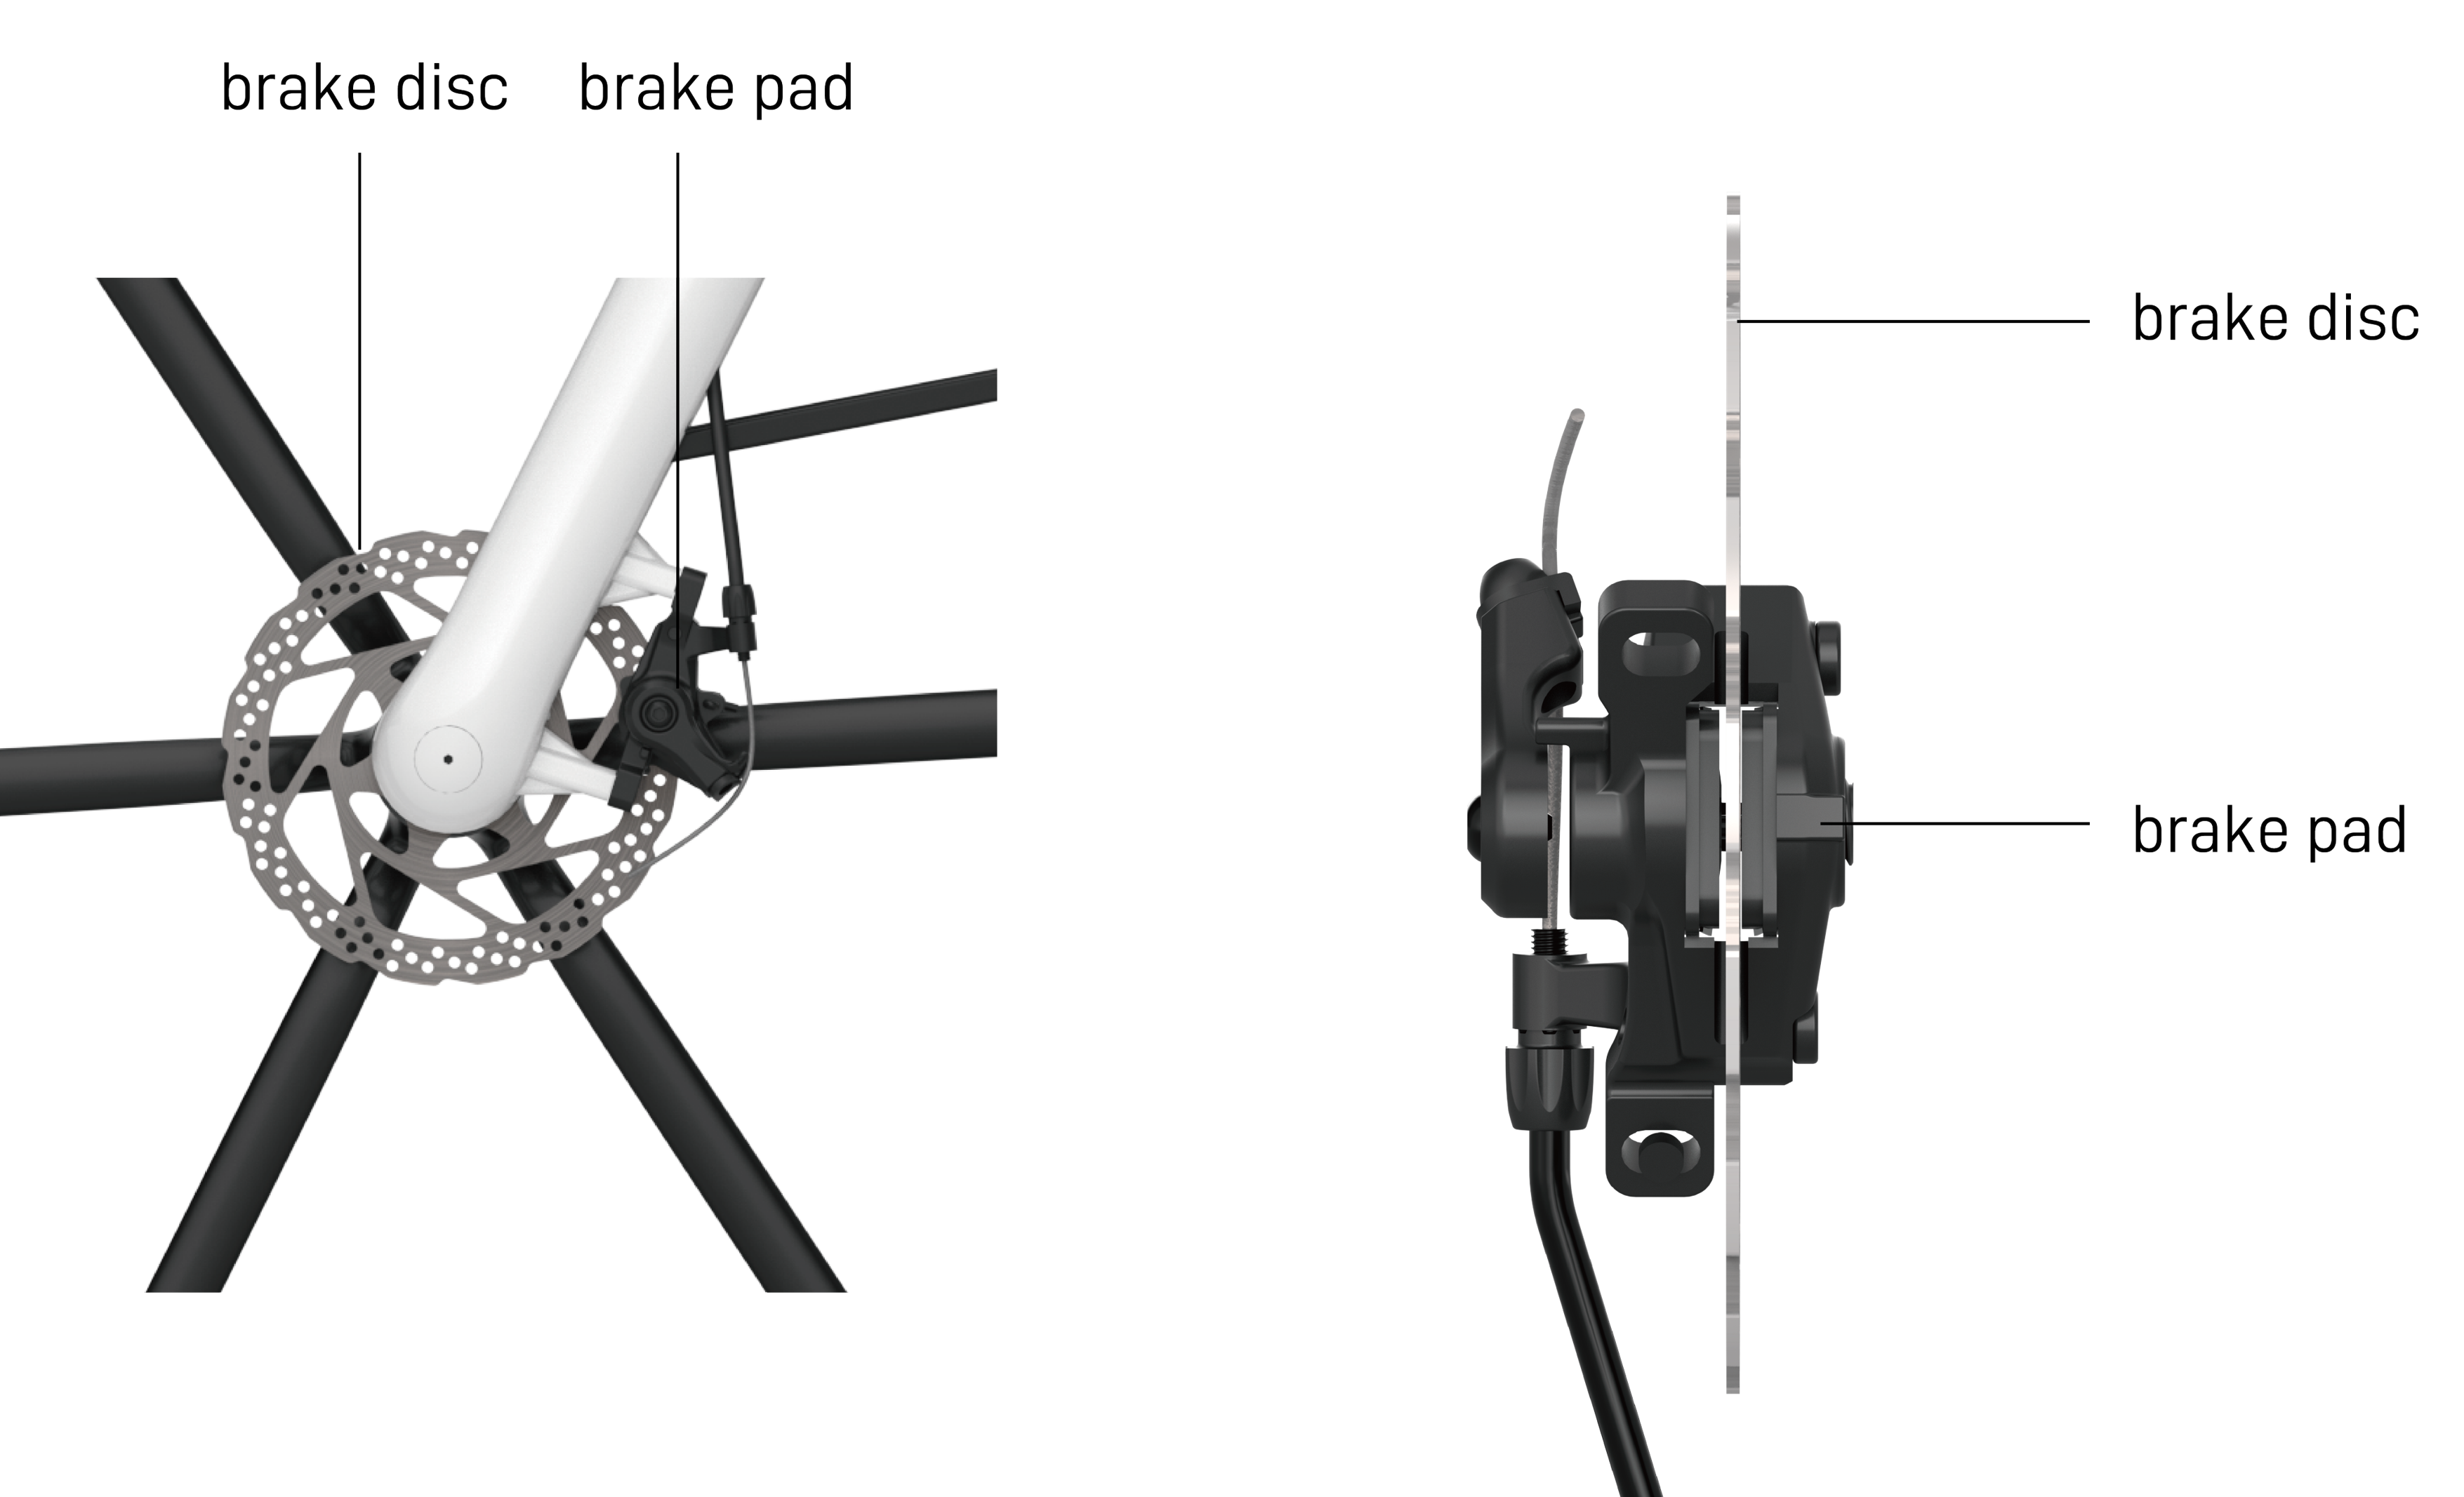
- 3. Put the front wheel into the front fork. Make sure the brake disc is aligned with the brake pad.
- 4. Install the axle on the front fork.
- 5. Place the washer and nut you removed before in sequence. Tighten up the nut on the outside clockwise using the socket spanner.
- 6. Cover the dropout cover on both sides.
- 7. Now you can flip the bicycle 180 degrees, and put down the kickstand.
5. Adjust the right brake lever
- 1. Find the screw under the right brake lever.
- 2. Use Hex Key #5 to loosen the bolt counterclockwise.
- 3. Once the bolt is adequately loosened, adjust the brake lever to an appropriate and comfortable position, then tighten the screw clockwise.

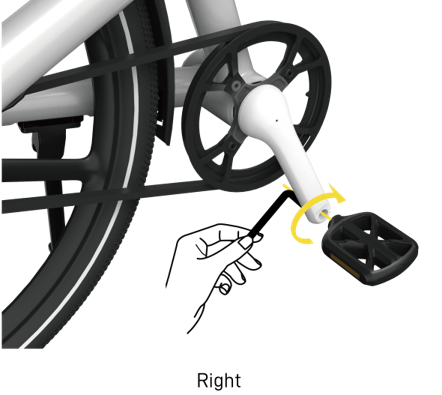
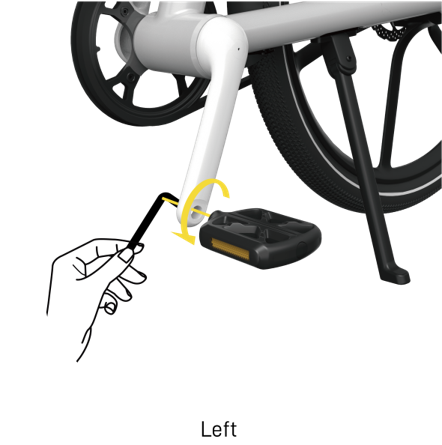
6.Install the pedals
- Right:
- Take the right pedal with the label R. Screw it clockwise onto the crank by hand. Use Hex Key #6 to tighten it.
- Left:
- Take the left pedal with the label L. And then screw it anticlockwise onto the crank. Use Hex Key #6 to tighten it.
7. How-to-Adjust-Seat Height
- 1. Turn the seat post lock clockwise.
- 2. Lift the saddle upward to appropriate height.
- 3. Tighten the seat post lock counterclockwise until it is locked perpendicular to the ground.
- 4. When you see the “Minimum Insertion" warning mark, the saddle has been raised to its highest position.
2. Before Your First Ride
1. Check if the front fender bolts, front wheel nuts, brake lever bolts, saddle adjustment bolt, and saddle clamp bolt are tightened before riding.
2. Electrical system
- Make sure that you are familiar with the functions of all buttons and the meanings of the display information by referring to the content in the relevant sections of the electrical system.
- Before you set off for the first time, check whether the battery is fully charged.
- Check if the front light and rear light can be turned on normally and if the front and back reflectors are not damaged.
- Check if the display works normally.
3. Transmission system
- Push the bicycle forward and backward, check whether the front and rear wheels can rotate smoothly to ensure that there is no stalling or unsteadiness during riding.
- To inspect the belt, rotate the rear wheel and check the inside and outside surfaces, looking for cracks, missing teethm tears, or holes.
4.Tires
- Check tire pressure. Press the tires with your thumbs, which shall be solid and firm. If the tire pressure is insufficient, inflate to an air pressure of at least 3.4 - 3.6 bar (50 Psi), but over-inflation(4.2 bar) should be avoided.
5.Handlebar
- Check whether the handlebar and front wheel are straight. Make sure the groove on the stem is aligned with the mark on the head tube.
6. Saddle
- Adjust the saddle to a proper height. Check that you can reach the floor with the tip of your toes when sitting on the saddle.
- Check if the seat post is locked tightly before riding to ensure that the saddle and seat tube are securely fastened.
7. Brake
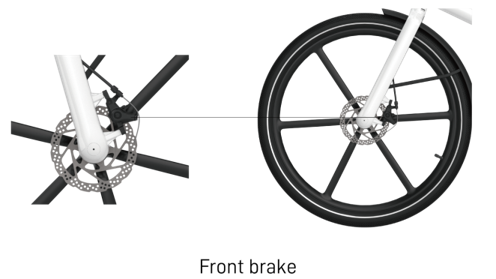
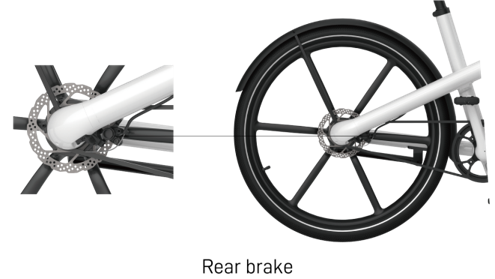
- During the assembly at HONBIKE, the right brake lever is used to control the rear brake and the left brake lever is used to control the front brake. Check if the brake setting could match with your habit. Try to use the rear brake first when braking.
- Stand next to the bicycle, pull the left and right brake levers at the same time and push the bicycle forward, the brake discs should be able to prevent the wheels from moving.
- You need to try braking on a flat, non-slip surface to make sure you can get used to the braking effect of the HONBIKE Uni4 before riding it in traffic on a public road.
NOTE: In the UK, China and Japan, the brake setting is different with the left brake lever for rear brake and the right brake lever for front brake.
8.Pedals
- Check whether the pedals are tightened onto the cranks.
3. How to Register your Honbike Uni4?
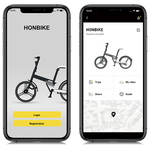
Before using your HONBIKE, we recommend to register it via the HONBIKE app. You can scan the QR code on the second page of the owner’s manual or go to Apple store or Google play store to download the app.
- Open the HONBIKE app, press Register to create your HONBIKE account.
- Select your region and enter your email address. Enter the Verification Code we send to the email address. And then set your password.
- Once you have successfully created your account, log in with your account. Now you can register your HONBIKE by pressing Owner registration.
- Scan the frame number and validation code on the back of your owner's manual.
- Press and hold the Power button on your HONBIKE until the display is on.
- Your HONBIKE will be connected to the app automatically. It usually takes 3 to 8 seconds, depending on the connectivity.
- When the Bluetooth and the Lock icon on your app light up, you have successfully connected your HONBIKE to the app.
*Notice: Before use your HONBIKE, you need to register your Honbike via Honbike app. You will need a mobile phone, the owner’s manual and your eBike.
- Register Your eBike in 3 Setps
Step 1: Download HONBIKE APP


Step 2: Create your HONBIKE owner's account
- Open your HONBIKE APP.
- Choose 'Registration' button.
- Select your region and enter your email address to create HONBIKE owner's account.
- Once success, log in with your account for the e-bike registration steps.


Step 3: Register your Honbike
- Check the back of your owner's manual.
- Find the frame number and verification code section.
- Use your phone to scan the number & code to register your HONBIKE.
*Notice: Each eBike can only be registered by one email account at once. Please confirm that you are the owner of the e-bike.


4.General Questions of Uni4
Charging the battery
When the battery is running out, the last grid of the battery indicator would flash, which means the battery needs to be charged immediately. Gently open the rubber cover and insert the charger plug into the charging port. It takes about four hours to complete charging, and when the color of the charger light turns from red to green, the battery is fully charged. Unplug your charger and put the rubber cover back on when your bike is fully charged.
Can I also use Honbike Uni4 when the battery is empty?
Yes, without the battery, you can still pedal your Honbike Uni4 as a regular bicycle with the added benefit of low maintenance and arriving with clean trousers.
What is the torque of the Uni4 motor?
The motor of the Uni4 is HONBIKE proprietary to offer our users the best riding experience. It’s a 36V 250W rear hub motor that delivers 45Nm of boost torque.
Maximum permitted overall weight
HONBIKE Uni4 can carry a maximum load of 120kg. Riding range and speed will be affected by the load carried by it, power assist settings, road conditions, tyre pressure and weather conditions.
NOTE: Exceeding the loading capacity will void all warranties and may result in unsafe operation of the product, which in turn may affect your life safety.
NOTE: Make sure you have good control of the e-bike carrying your luggage and keep it balanced. If you can't control it well, please reduce the weight of the luggage. Sudden shifts in load while riding can affect your balance and lead to serious injury or death. We recommend that you practice how to control the HONBIKE Uni4 with luggage in a safe area before riding on public roads.
What’s the range of Honbike Uni4?
Honbike Uni4 supports a maximum range of 100 km* on a single charge.
* Test Conditions: Riding mode: Eco; Wind conditions: Light breeze; Terrain: Mostly flat; Rider’s Weight: 75kg; Temperature: 25 degrees, Tyre Pressure: Maximum.
How to increase riding mileage?
Many conditions may affect the range of the bicycle, including load, riding speed, rider's pedal power, tire pressure and type, road conditions and weather conditions. Continuous use of motor assist and/or selecting the highest speed mode while riding will reduce the HONBIKE range.
To maximize the range of HONBIKE, you can try the following method:
- Try to pedal as much as possible.
- We recommend you to use the low power assist level to ride the bicycle on flat roads or downhill roads and select the high power assist level when riding against the wind, uphill, and with heavy loads.
- Try to keep the load to a minimum level.
- Inflate the tires properly and keep the tire pressure within the normal range.
- In case of poor road conditions (e.g., bad pavement, potholes or speed bumps), reduce the speed and adjust the riding modes.
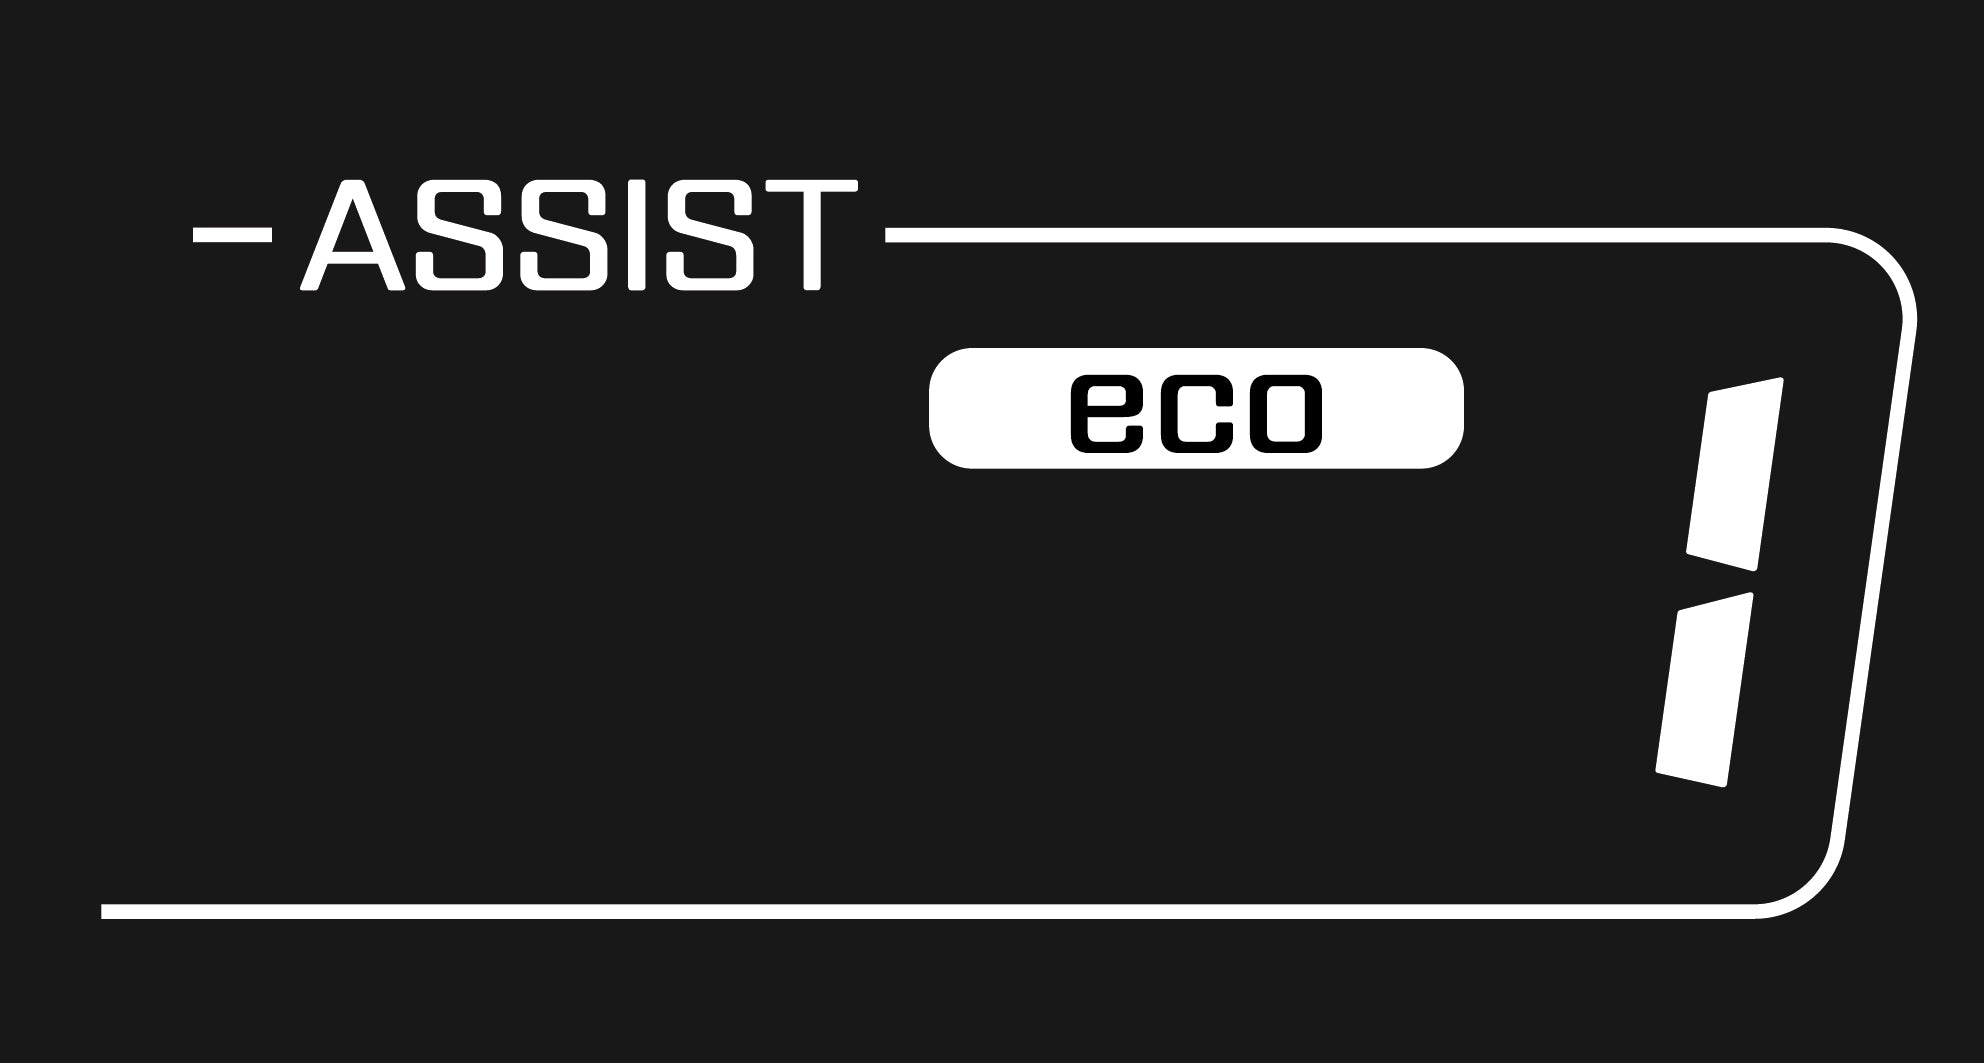
How to set the pedal assist level?
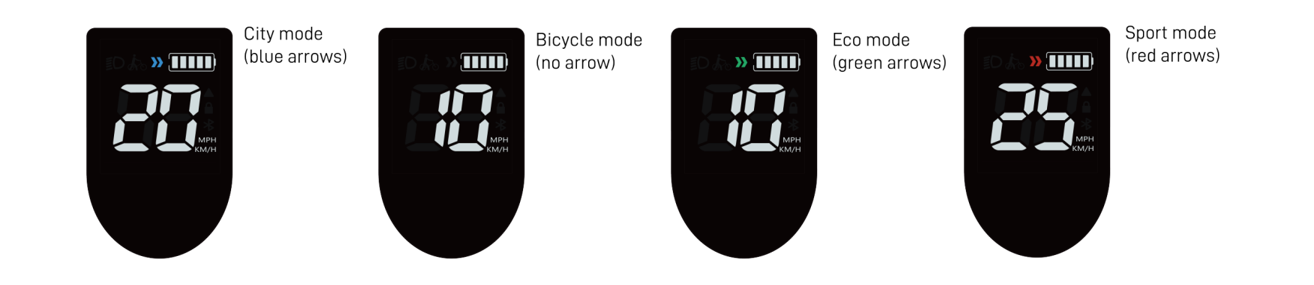
Uni4 is equipped with four riding modes.
Bicycle mode: The motor will not offer any assistance, but the display and lights will still function.
Eco mode: Most efficient mode for maximum range while offering a small level of power assist.
City mode: Medium power mode, medium range.
Sport mode: Maximum power mode for high-speed riding.
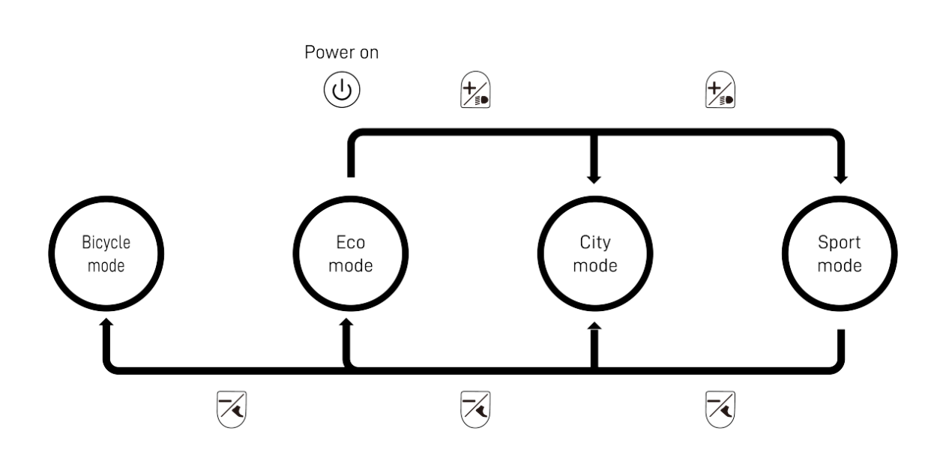
Short press the Plus or Minus button to switch between different riding modes.
Eco mode is the default configuration when your Uni4 is first turned on.
In the Eco mode, short press the Plus button to switch to the City mode, and short press the Minus button to switch to the Bicycle mode.
In the City mode, short press the Plus button to switch to the Sport mode, and short press the Minus button to switch to the Eco mode.
In the Sport mode, short press the Minus button to switch to the City mode, and short press the Minus button one more time to switch to the Eco mode.
How deep can Uni4 climb?
Uni4 can run at 9-12 mph (15-18 km/h) up an 18% grade hill (load: 85 - 90kg) with maximum power assistance.
Is Honbike Uni4 a single speed e-bike? How many gears does Honbike Uni4 have?
Yes, Honbike Uni4 is a single-speed e-bike with a gear ratio of about 2.5. However, you can use electrical power to assist you to tackle different terrain without the need for multiple gears. Besides, Honbike Uni4 has a built-in SmartHON system that adjusts and delivers the power assistance you need based on the terrain and your riding behavior. It gives you adequate power assistance when riding on flat terrain and offers an additional power boost to make your uphill rides a breeze. You don’t have to worry about which gear to switch on when you go uphill and back to flat terrain. Let the Honbike SmartHON system do the job for you and make your riding experience as easy and comfortable as possible.
What's the difference between the EU version and the US version?
The US and EU version differs in motor power. The US version is with 350W motor power while the EU version is with 250W motor power.
How about the waterproof rating?
Thanks to the unique design and engineering confidence, Honbike Uni4 is higly water-resistant, it allows you to clean the bike with a hose directly and you can even store or ride the bike during light showers.
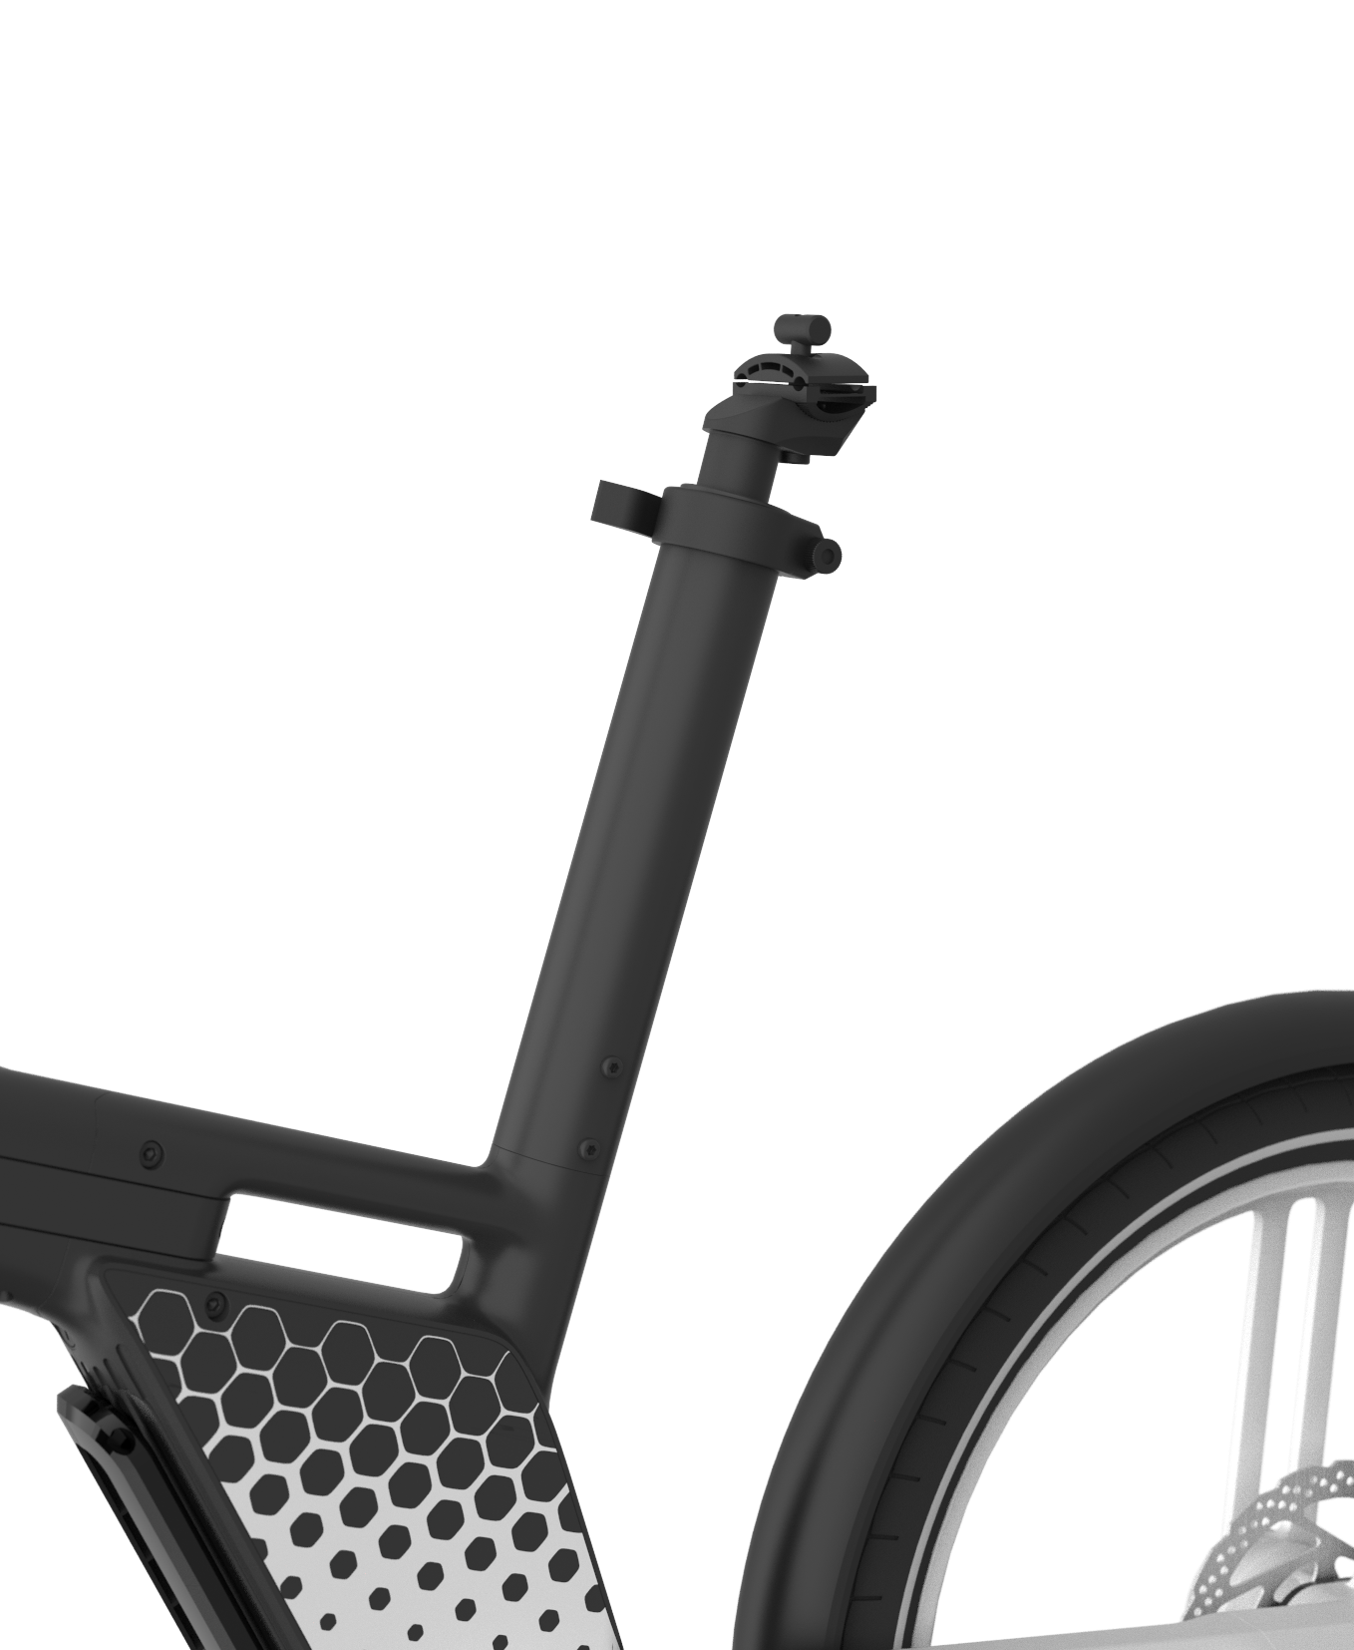
Adjusting the saddle position and angle
1. Remove the rubber plugs on the bolts and keep them safe. Use Hex key #5 to loosen the saddle adjustment bolts.
2. Once the bolts are adequately loose, the saddle can be moved forward or back and angled up or down.
NOTE: Do not exceed the maximum limit marking on the saddle rail when you move the saddle.
3. Move the saddle to the desired position, and tighten the bolts. Install the rubber plugs to protect the bolts.
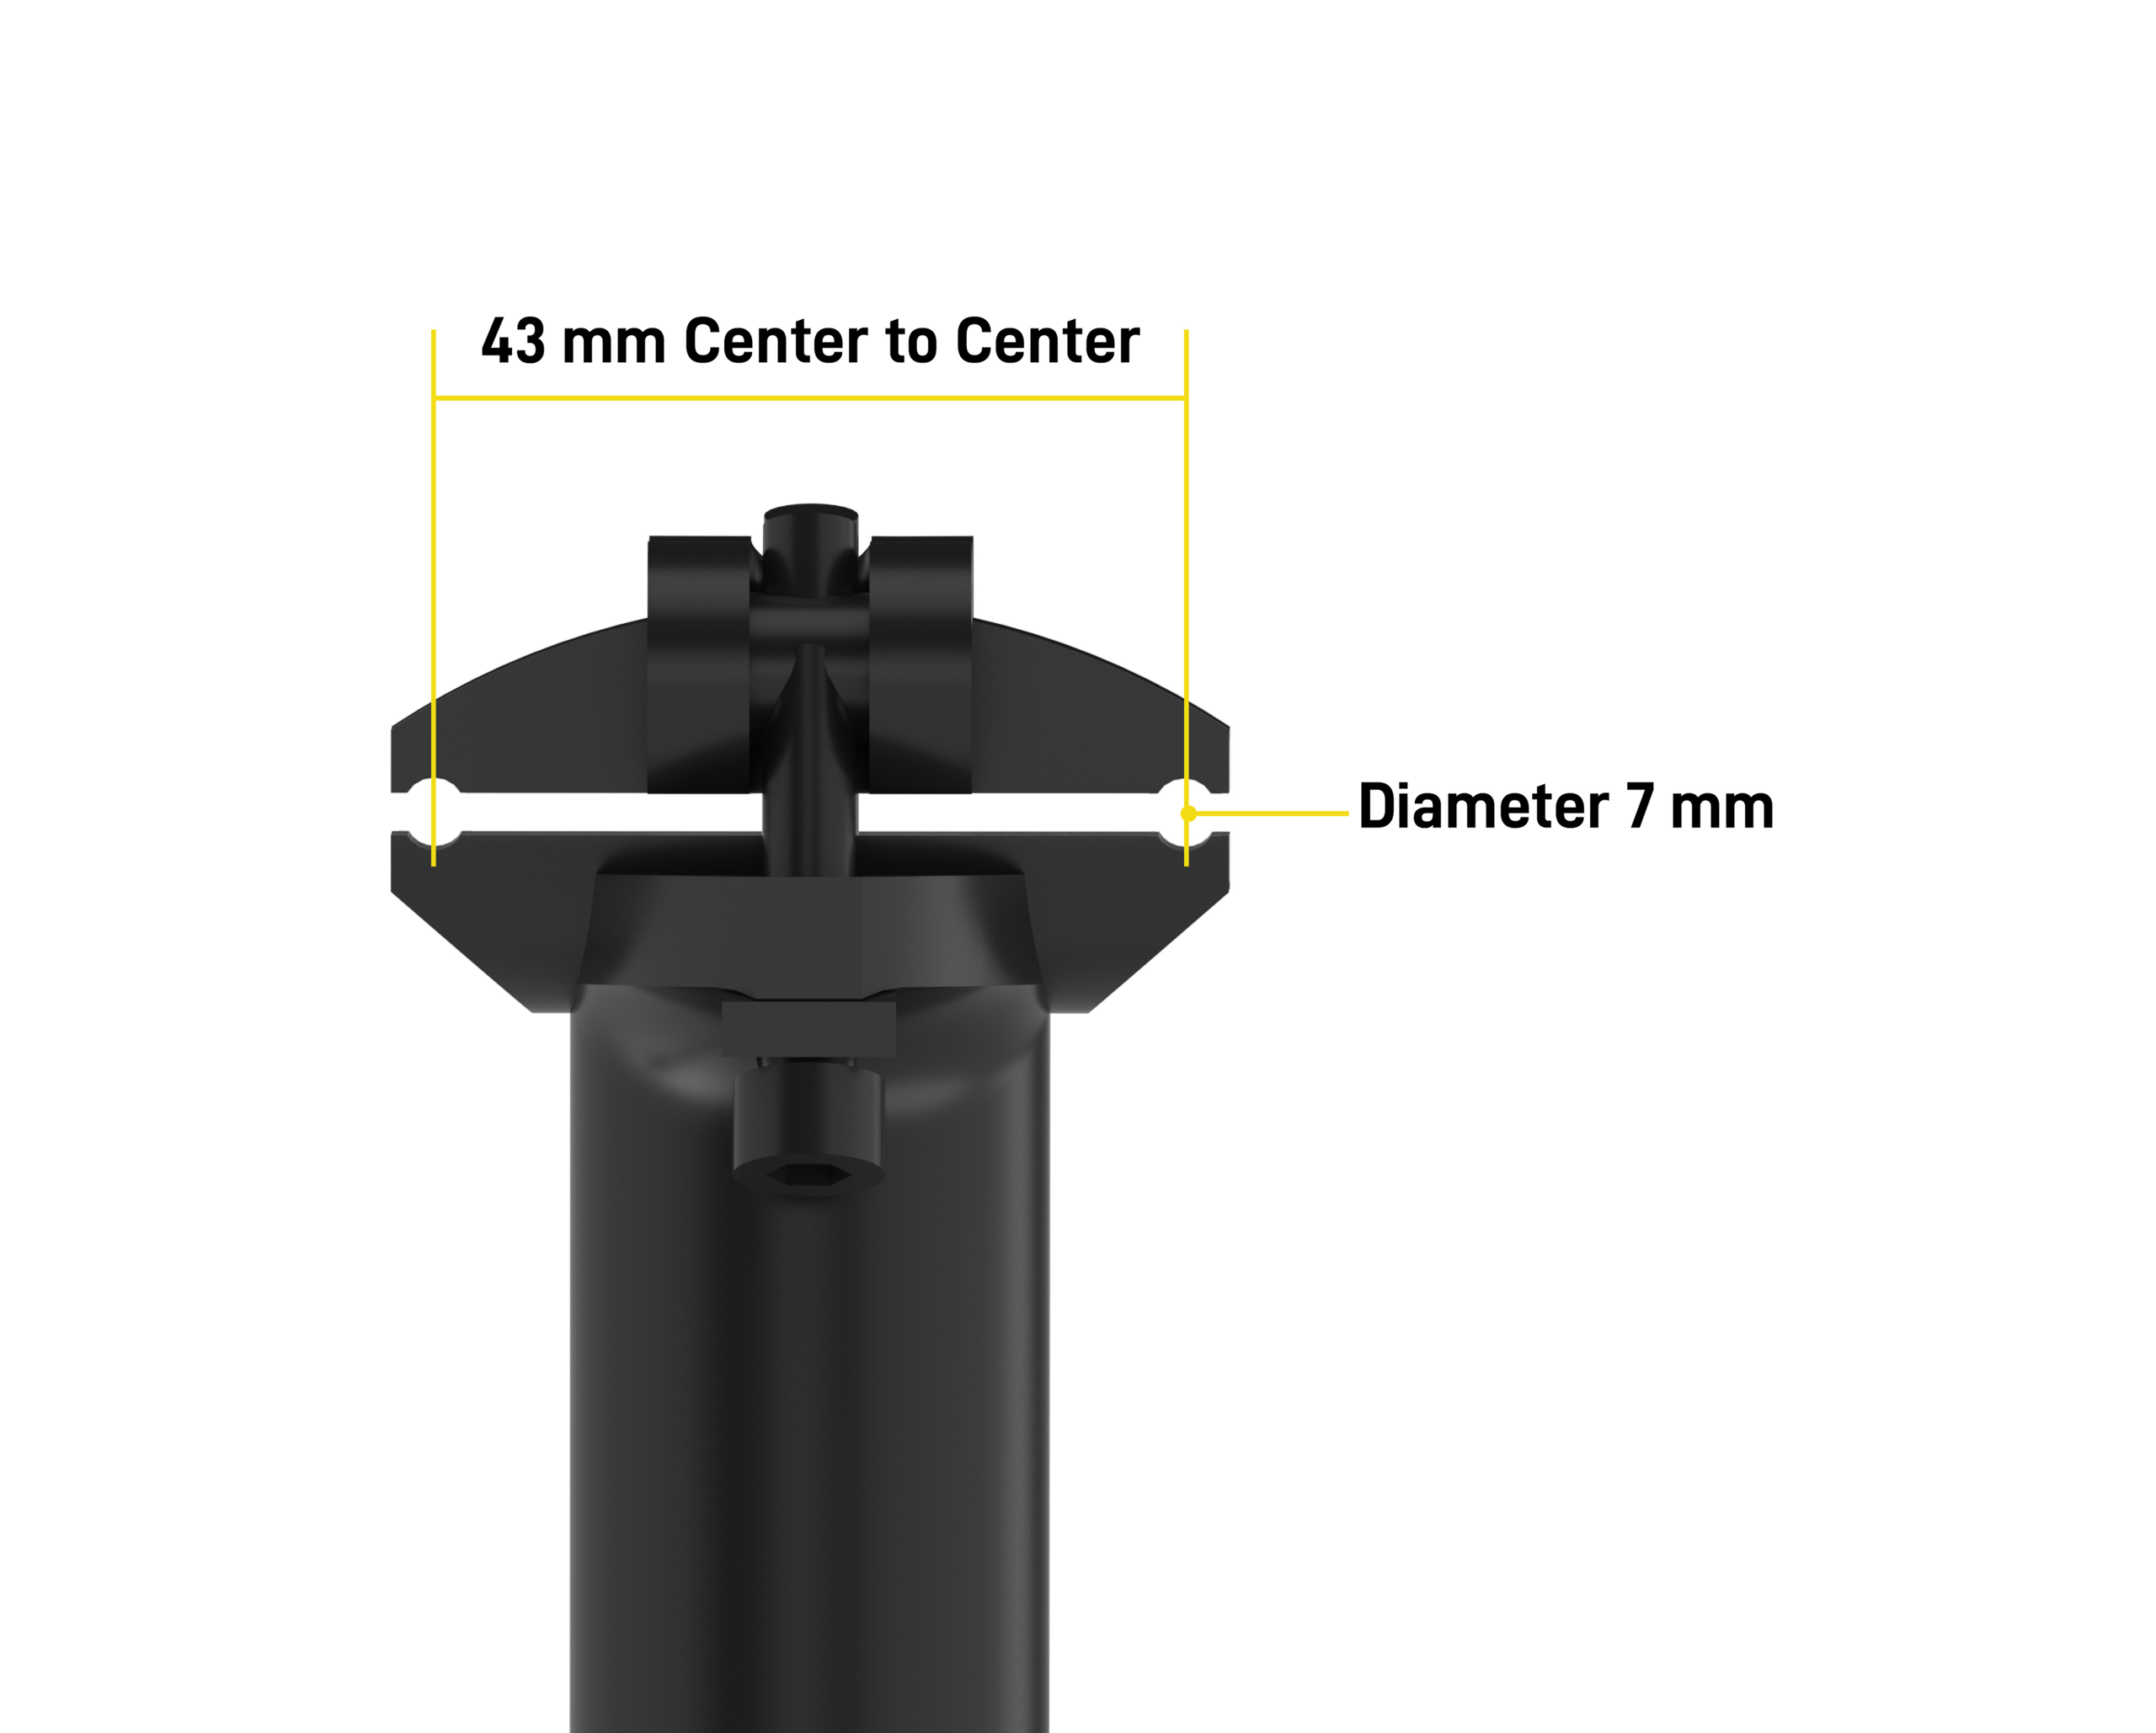
Can I change the saddle?
Yes! Honbike Uni4 can be suitable with the most saddle in the market. If you prefer to change it to your desired one, please note the size of the saddle rail to ensure that it fits the Honbike Uni4.
* Rail diameter: 8 mm
* Rail width: 43 mm Center to Center
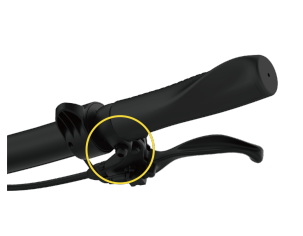
Can I adjust the brake lever angle?
Yes. You can adjust the brake lever angle by loosening the bolt on the bottom of the brake lever using Hex key #5. It is important to make the adjustment based on your standing position on the bike. Make sure you have adjusted to the correct position and tighten the bolt.
Can I customize my bike?
Many parts of HONBIKE Uni4 are customized, which aren’t compatible with regular ebike parts. Please do not replace any parts or change battery capacity or motor power unless instructed to do so by HONBIKE to avoid damage and danger. If you have made any changes without permission, you shall solely be responsible for any consequences.
How to lock/unlock HONBIKE electric system
The HONBIKE's electric system can be locked by tapping the lock icon on the HONBIKE app. Or by pressing the Power and Minus buttons simultaneously on the bike for 5 seconds. And it can be unlocked only by the HONBIKE app.
5.Servicing & Maintenance of Uni4
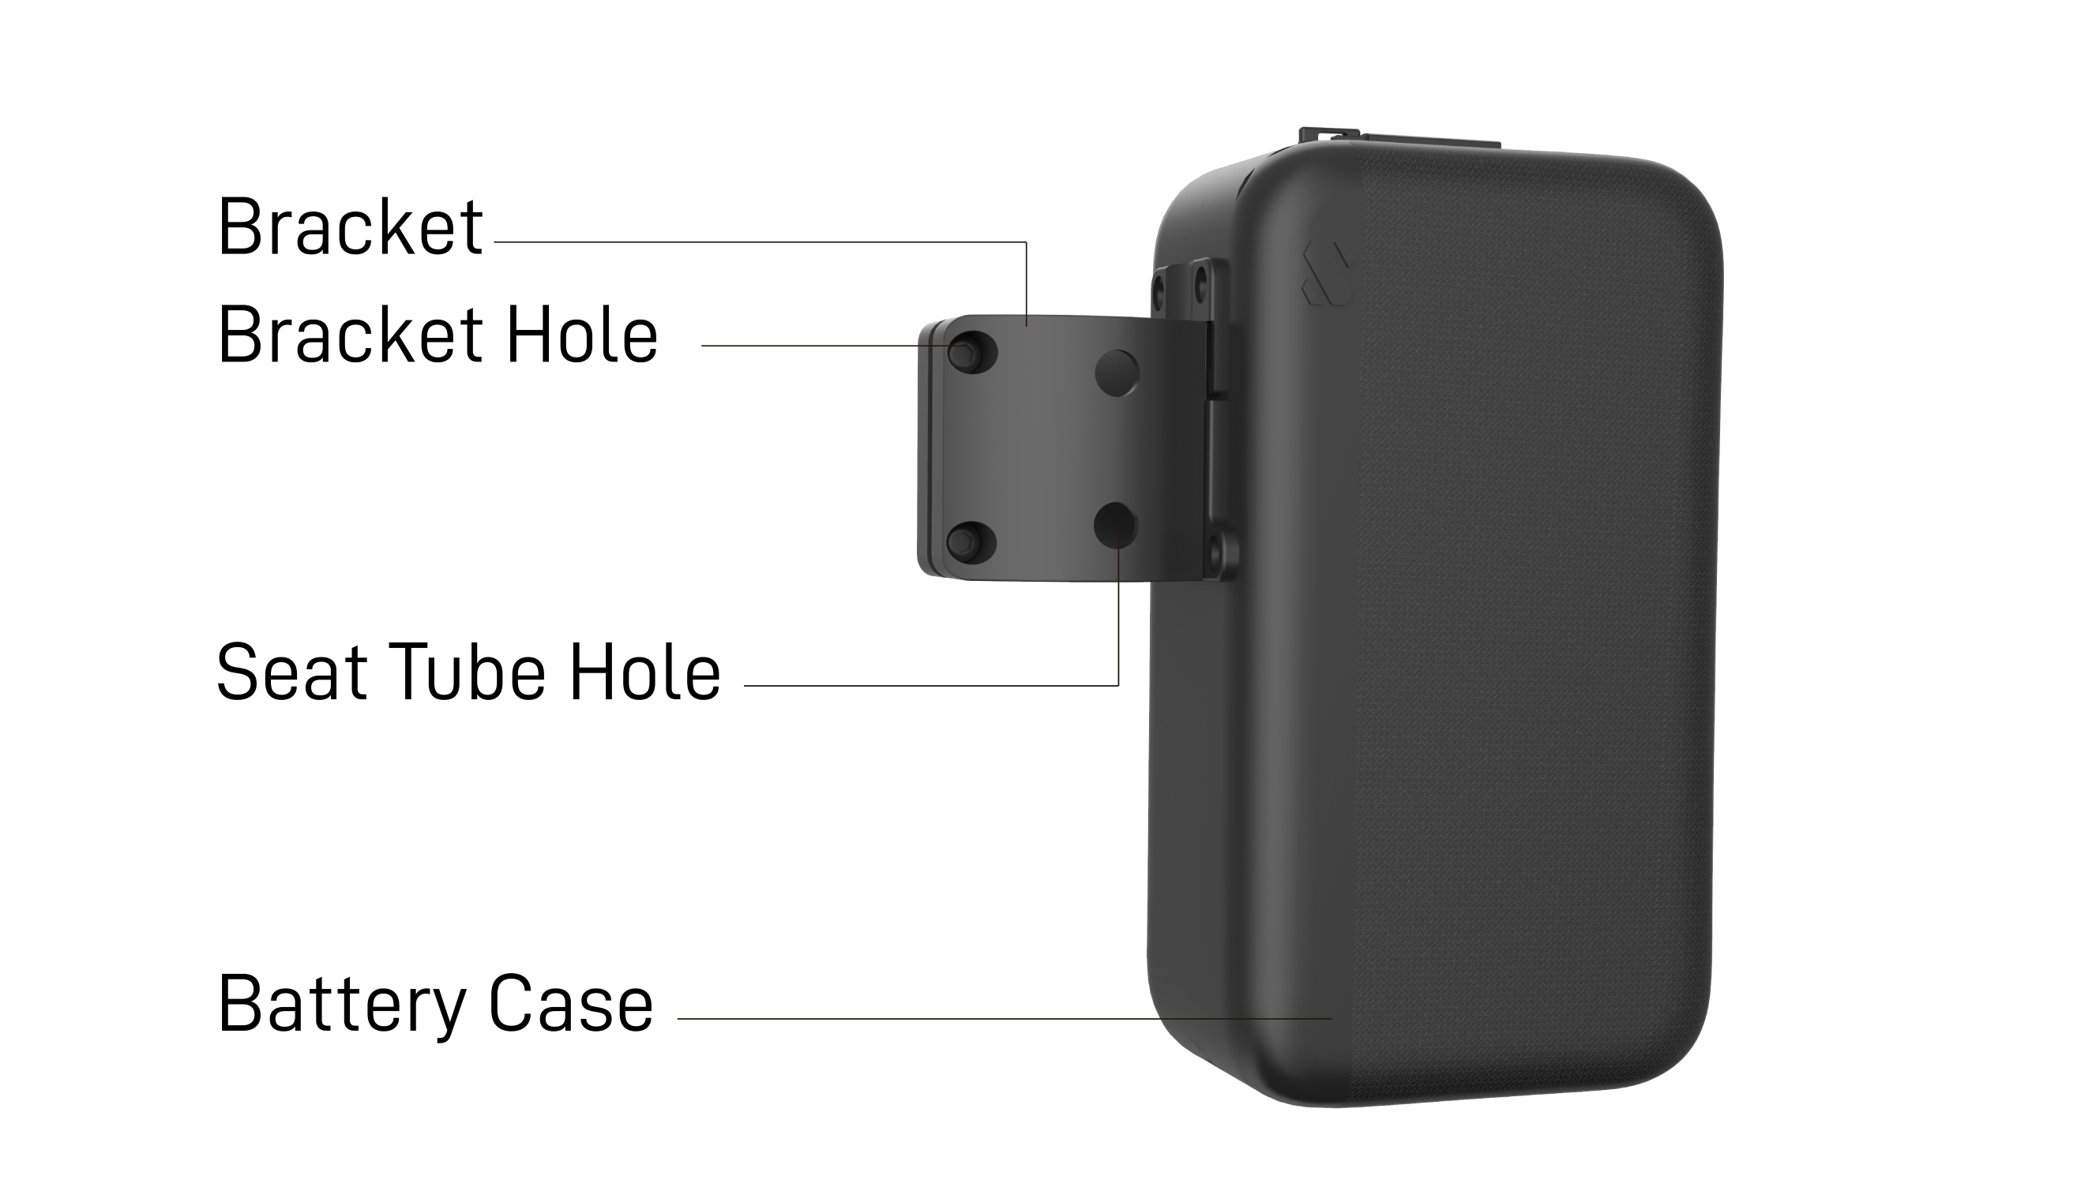
Can I add accessories to my Uni4, such as a child seat or a phone holder?
You can check the accessories for Uni4 here . Now a rear carrier and water bottle holder model are available, and we'll keep developing and launching new accessories for Uni4.
Please be aware that adding third-party accessories may void your bike's warranty.
Due to Uni4's unique frame design, the rear carrier for Uni4 has only one mounting point, which is secure enough for carrying goods. But it is not designed to carry children, please do not install child seats on the rear carrier.
How often should I get my bike serviced?
The user shall be responsible for safe riding and regular maintenance. Your bicycle needs a regular service. Below is our recommended service frequency based on how often you ride.
Monthly (or every 500kms/ 300 miles )
- Check tire pressure. Press the tires with your thumbs, which shall be solid and firm. If the tire pressure is insufficient, inflate to an air pressure of 3.4-3.6 bar, avoid over inflating your tyres.
- Clean and lubricate moving parts regularly.
- Check that all hardware is tightened to the torque specifications listed in the Recommended Torque Values section of this manual.
- Check your brake pads for signs of wear. Replace if necessary.
- Check the frame, front fork, kickstand, and belt for any damage, deformation, or cracks.
- Check all wiring harnesses (such as brake wires, front light wires ) of the whole bicycle for any damage or wear.
- Check the charger and its wiring harness for damage and check if the bicycle can be charged normally.
Quarterly (or every 1500kms/ 900miles)
- Check all items on the monthly service list above.
- Check tire tread for excessive wear. Replace if necessary.
- Check and update to the latest firmware version.
The maintenance interval of the belt of HONBIKE Uni4 is about 10,000 km. Please do not replace it without permission. To replace, please find a professional organization or designated maintenance location of HONBIKE brand for replacement. Or you can contact HONBIKE after-sales team at support@honbike.com
NOTE: This maintenance interval is based on normal usage. If you ride your Honbike HF01 more than average, or in rain, snow, or bad road conditions, maintain your bicycle more often than the suggested interval.
How to maintain your Honbike?
Compared with conventional ebikes, the HONBIKE Uni4 is low maintenance with fewer complicated parts that require less attention for simplicity. After riding for a period of time, like any bicycle, some parts may loosen, wear or become damaged, so inspection and maintenance at regular intervals will extend the service life of your HONBIKE Uni4 and prevent damage and potential accidents. Store your HONBIKE Uni4 in a clean, dry place to avoid rust and corrosion.
The maintenance of HONBIKE Uni4 is generally divided into the following tasks:
- Cleaning: Wipe the whole bicycle and parts with a damp rag and a low residual cleaner. Clean the belt when it’s visibly dirty. Dry thoroughly after cleaning to prevent corrosion and rust.
Remove any oil residue on the brake discs.
- Inspection: Brakes, tires, lights, and belt should be inspected regularly. Please refer to the sections “Before the First Ride” and “Before Every Ride”.
- Tightening: The fasteners of the whole bicycle should be tightened periodically by referring to the section of Recommended torque Values.
- Lubricate: Clean and lubricate the joint between the pedal and the crank.
- Adjustment: Brakes should be adjusted periodically. Ensure front anad rear brakes work properly. Check brake cable tension, replace brake cables if necessary.
- Replacement: If a part is damaged or unusable or has any cracks, scratches or color changes, the part has reached the end of its service life and should be replaced promptly.

Battery safety information
- In order to get the maximum life from your battery you should take care to use, store and recharge it correctly.
- The battery is generally not fully charged when the bicycle is stored and transported. So be sure to fully charge the battery before using it. If the battery is used without fully charging, its service life will be compromised.
- Disconnect the battery after it is fully charged, and do not charge it for more than 5 hours each time.
- Do not leave the bicycle unattended when it is being charged.
- Never charge your bicycle in a room that does not have an appropriate smoke detector. Make sure you can hear your smoke detector throughout your house.
- When charging, please place the bicycle in a safe place inaccessible by children.
- Battery charging and discharging conditions: the battery shall be charged at 0°C~45°C and discharged at 0°C~60°C; If the bicycle is used in cold weather, leave it indoors for at least an hour to reach room temperature before charging.
- When the battery is not used for a long time, please charge it for 30 minutes or to 75% every three months, to prevent over-discharging. Over-discharging will lead to permanent damage to the battery.
- The bicycle shall be protected from impacts, rain, water immersion, heat ources, destruction of appearance and short circuit of terminals.
- Please do not disassemble the bicycle and the battery without permission. HONBIKE is not responsible for any problems caused by unauthorized disassembly.
- Riding in cold weather will reduce the range of the battery by up to 50%.
- The battery provided for HONBIKE Uni4 shall not be used in an empty state. HONBIKE is not responsible for any problems caused by customers using empty batteries without permission. Do not dispose of any battery packaging materials.
- Please dispose of used batteries according to local laws and regulations. Do not dispose of any used batteries randomly to prevent environmental pollution.
- Please place the charger on a solid surface for charging and do not to cover it during charging. Do not place it on a carpet or textile surface or block its vents, as the charger may heat up during charging (up to 40-50°C).
- When using the charger, make sure there is no debris or flammable items around.
- The charger contains a HV circuit, so it is prohibited to disassemble or tamper with its power management system without permission; when using and storing the charger, liquid and metal particles should be prevented from penetrating into the charger, and the charger shall be protected from drops and impacts.
- Check the charger, charger cables, and battery for damage before beginning each charge. Do not use any damaged charger or plug for charging.
- Do not attempt to disassemble the battery. Risk of fire.
What is the life cycle of Honbike Uni4 battery?
Honbike Uni4 lithium-ion battery delivers 500 charge cycles at which point the battery declines to 80% of its original capacity.
If your battery is broken, it can be serviced/ changed at our service center. Please contact support@honbike.com
Care for your carbon drive
HONBIKE Uni4 has equipped the Gates Carbon Drive™ belt that is extremely durable and offers long life when properly handled.
- Wash with water to remove debris
- Do not twist, backbend, crimp, invert, bundle, or zip tie the belt. Do not use the belt as a strap wrench or chain whip. Do not lubricate, pry on, or roll on the belt.
- Proper belt tension is essential for optimum operation of the Gates Carbon Drive System. Lack of belt tension can lead to “skipping”. Too much tension can damage other components and increase the wear of your Carbon Drive System. The Gates Carbon Drive Mobile App can measure the belt tension in the form of the natural frequency (Hz) of the belt span.
- Replace your belt when it shows these signs of wear and tear.
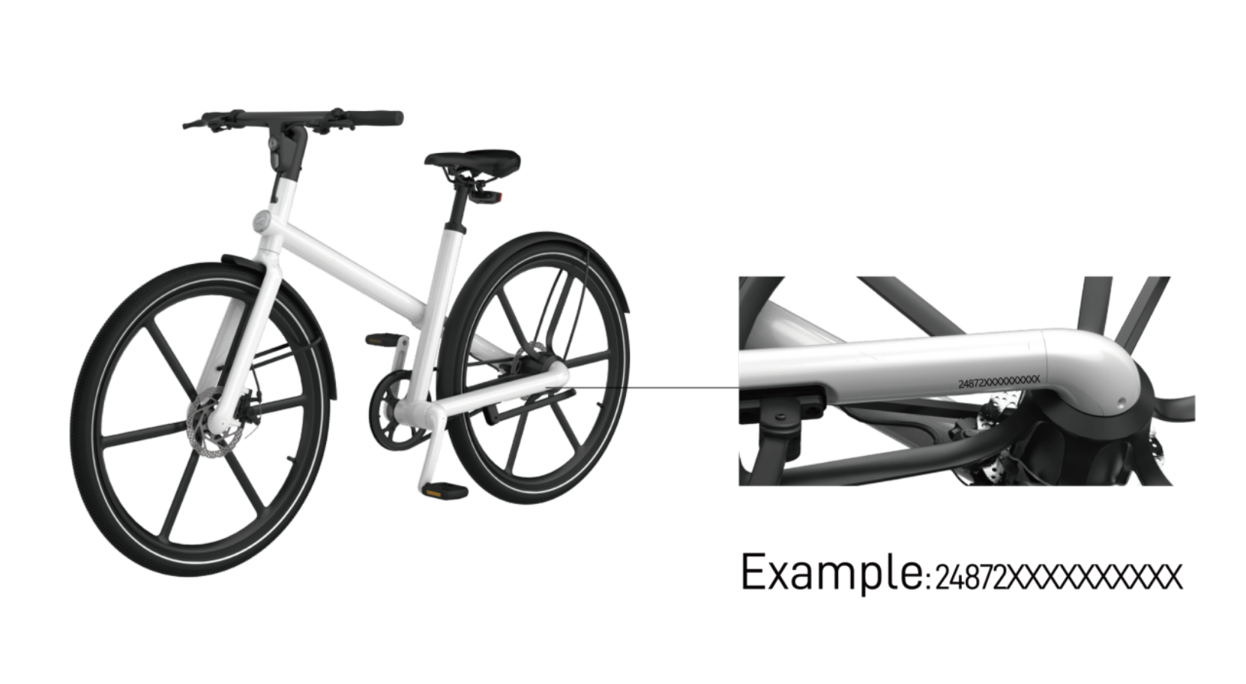
Where can I find Uni4 frame number?
The frame number of HONBIKE Uni4 can be found on the frame. It consists of 15 digits. You can also find it on the back of your owner's manual.
I can’t connect my Uni4 to the HONBIKE app
Uni4 connects to the HONBIKE app via Bluetooth. If you can’t connect your Uni4 with the HONBIKE app, you can go through the following steps below to solve the problem,
- 1. Please make sure you select the same region as your registered account when you log in.
- 2. Please make sure the account you log in to is the same as the account you used to register your Uni4.
- 3. Ensure the Bluetooth of your phone is turned on, and your phone is within 10 meters distance of your Uni4.
- 4. If your bike still can’t be connected to the app, please restart your Uni4 and the app.